THOR Diamond

Next Photo ›
Up Next  Lightning Adjust™
Browse 12,010 Customer Photos
$3,400.00  $2,699.00   Order Now
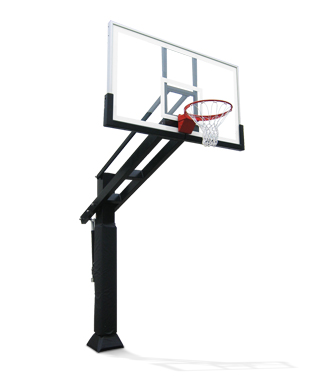
The ultimate basketball system boasting the largest pole on the market perfect for large playing areas. There is no drop off coming home from the gymnasium to practice on your new THOR Diamond. The regulation size backboard and competition grade break-away rim deliver incredible performance demanding athletes will appreciate. Effortless height adjustment down to six feet gets young competitors into the action immediately.
Industry's largest main pole at 12"x8" delivering unrivaled rigidity
Regulation 72" backboard made with full 1/2" thick glass bringing gymnasium play to your court
Extra long 5' overhang allowing for a regulation baseline on courts
Video: THOR Diamond Top Features
Pole
Pole Size12" x 8" with 7/32" (5 gauge) thickness
Steel TypeStructural (mild) carbon steel with .29% carbon and a density of 7.85 g/cm3
Pole / Gusset PaddingIncluded. Custom fitted weather resistant vinyl covering with 1" thick high-impact padding
Flanged Base14.2" x 14.2" x ½" self-leveling
Flanged Base HolesOblong allowing you to square by twisting
Gussets8 of them each 3/8" thick
Backboard
Backboard Size72" x 42" x 1/2"
Backboard MaterialTempered Glass
Backboard Frame Size2" with ¼" thickness
Backboard Frame MaterialAluminum with steel reinforcement
Glass To Frame MountingMechanically encased in channel with rubber gasket
Rim Mounting TypeThrough glass using grommets. No pressure on glass.
Backboard PaddingIncluded. Custom fitted weather resistant polyurethane-skinned 1" thick high-impact padding with molded steel inserts for mounting. Pre-installed.
Extension Arms
Overhang5' (front of pole to front of backboard)
Main Extension Arm3" x 2" with 1/8" (11 gauge) thickness. Has two cross members
Upper Parallel Linkages1 ½ x ½" with 1/8" (11 gauge) thickness
Height Adjustment
Adjustable FromAnywhere between 6' and 10'
Adjustment handle height from base2'
Lift Assist Cartridges2 cartridge, 2 springs each
Lift Assist Power200 pound-force per square inch (PSI)
Shipping
ServiceIncluded* LTL freight curb-side delivery
Lift-GateIncluded
Scheduled DeliveryIncluded
Residential DeliveryIncluded
Weight792 lbs.
Shipping Weight912 lbs.
Packaging Configuration5 cartons accross 2 pallets
Fasteners (nuts bolts & washers)
Material (Standard Version)Structural (mild) carbon steel with .29% carbon and a density of 7.85 g/cm3
Material (Rust Armor Version)Stainless steel with UNS Designation of S20100
Rust Armor Version
AvailableYes
Structural TreatmentHot Dip Galvanization
Fastener MaterialStainless steel with UNS Designation of S20100
WarrantyExtended. Covers corrosion damage as long you own the system
Anchor and Pier
J-Bolt Count6
J-Bolt Size3/4" diameter 18" long
J-Bolt MaterialUltra-high carbon steel with zinc galvanization
Warranty
Limited Lifetime WarrantyYes
Covers Dunking & HangingYes
In-Stock   Ships in a week
Delivery date, video & more
Receive your hoop a day faster
Order within and we’ll ship today
Install Service  Available in most areas
Average $700.00
Thinking about self-install? You’re not alone.
Installation Directions
Installation Video Pier Assembly
Resources Center
THOR Diamond
$3,400.00
Tax Refund Sale
-$701.00
Basketball  Details
FREE
Pole & Gusset Pad  Details
FREE
Backboard Pad  Details
FREE
Shipping*  Details
FREE
Choose Options
Version
$0.00
Rust Armor$149.00
Standard$0.00

The Rust Armor version is best for areas with all four seasons or wet climates.

Manufactured with upgraded stainless steel hardware and galvanized finish. Backed with lifetime corrosion damage warranty.

Details
Adjustment Type
$0.00
Standard Hand Crank $0.00
Lightning Adjust $249.00
Add drill $149.00

Lightning Adjust upgrades your system with the industry’s first and only drill powered adjustment mechanism. 5 to 10 feet in under 10 seconds with the squeeze of a trigger. Patent pending.

Use your own battery powered drill or add one to your order

Comes with a manual hand crank as backup

Learn More

Add Drill
$0.00
No Drill $0.00
Add Drill $149.00
Configured Price
$2,699.00ea
Up Next  Delivery & Install
Top 10 Rated Product
Dunking Lifetime Warranty
60 Day Low Price Guarantee
Answers Ask Question
Answer ID 48
How does getting professional installation service work?

In most areas, professional installation service is available

We keep a well vetted list of professionals nationwide that have experience with our hoops and that are reviewed by our customers.  Find installers near me

Installation is purchased separately directly with the installer who should be able to give you a price over the phone or after a consultation visit for more complex installations.  Depending on the area and installer, the average price of installation is usually around $500 to $600.  We recommend lining up installation before ordering to make sure you're comfortable with the installer's price and timeline.

In some areas we offer installation service directly.  If you're in one of our areas you can purchase installation during the checkout process.  We'll call shortly after to answer any questions you might have and schedule your install.

Answer ID 46
How far off my driveway should I install my pole?

Typically about a foot for most driveway applications

Pro Dunk basketball hoops have between 3' and 5' of overhang depending on the model. Overhang is defined as the distance from the front of the post to the backboard. It's beneficial for players to allow room for layups and rebounding. It also gives you flexibility when placing your post.

A few things to consider when placing your post

It's recommended that the backboard hang over the playing are at least two feet to allow for regular play underneath the basket
On a regulation court, the baseline (out-of-bounds-line) underneath the basket is supposed to be four feet behind the backboard
Setting the post off the driveway a little can help prevent things like a car backing into it or a snow plow clipping it

Check out our great video going over all of the aspects in choosing the best location for your post.

Video Transcript

Welcome basketball fans. My name is Ryan with Pro Dunk Hoops. Today were going to be talking about how far from your driveway you should install your new basketball goal. I get this question on the phone pretty often so I thought I'd put together this short segment to kind of explain how to get the most out of your playing area. I've got some great diagrams to put up on the white board so, let's get started.

So, to answer our question, we're going to have to learn a little bit about what overhang is. And it's actually defined as the distance from the front of the pole to the front of the backboard here. And it's important because a lot of play actually goes on underneath the backboard or behind the backboard here. For example if you're going to be running in for lay-ups or boxing out for rebounds you're going to be in this area, playing quite a bit. Another thing is the basketball is not always going to land right underneath the basket so sometimes it'll come in from and angle like this and land right there. So you're going to want your playing area. So, let's say this is your playing area. You really want it just as close as possible to where your pole is going to be installed so you can take full advantage of the basketball goal's overhang. Now having said that, if you've got a shallowing playing area, so out here you do't have too much room and you want to get in a free-throw line or a three-point line or something like that you can actually pull that pole off of your playing area a little bit and get more area in front of the backboard instead of behind the backboard. Having said that you don't want, you want the backboard hanging over at least two feet. Otherwise you're going to run into a lot of problems with the ball hitting the grass and going and doing that. So, in summary, you're really going to want your pole just as close to the playing area as possible unless you have a very shallow playing area.

So, that's all of the information I've got for you today. I hope this is going to help you maximize your playing area and thanks for watching and remember better basketball goals, better prices, produnkhoops.com.

Answer ID 44
Is the pier kit included?

Yes it is

Everything you need for installation is included except the concrete. We even include the rebar used to steel reinforce your concrete.

The pier kit is sometimes called a concrete anchor or ground kit. It consists of four or six bolts (depending on the model) as well as a template to get those bolts into the correct hole pattern. This is sunk into your wet concrete footer during installation leaving about four inches of thread above ground. After the concrete has cured, the basketball system's pole is attached to these.

Watch our installation video showing the pier kit being installed

Pier Kit Hole Pattern Diagrams

THOR Platinum Gold & Silver, APOLLO 72
9" on center 4 bolt pattern
APOLLO 60 & 54
7" on center 4 bolt pattern

Answer ID 45
How big is the hole and how much concrete is required?

THOR Diamond & Platinum / HERCULES Diamond & Platinum / APOLLO 72
Hole Size: 24" square 4' deep
Concrete: 20-25 80 lbs. bags (3000 psi or greater)

THOR Gold & Silver
Hole Size: 20" square 3' deep
Concrete: 15-20 80 lbs. bags (3000 psi or greater)

APOLLO 60 & APOLLO 54
Hole Size: 16" square 3' deep
Concrete: 9 80 lbs. bags (3000 psi or greater)

Do not skimp if your soil is not very supportive like a sand. Watch our installation video

Answer ID 47
Can I use an epoxy wedge anchor to bolt my hoop to existing concrete?

Yes if your concrete is strong enough and thick enough

You should consult the bolt manufacturer's directions but typically your concrete should beat least 6" thick and steel reinforced. The thicker the better.

To determine how thick your concrete is, consider drilling a pilot hole. If you find your concrete is 6" thick you should get a bolt that is 9" long (5" down hole with 4" of thread that the basketball pole will attach to).

Some common bolt brands are Red Head and Hilti. You may need order these from a specialty hardware company like Fastenal to get the correct length and diameter.

If your concrete is not suitable for a wedge anchor it's very common to cut / jackhammer through it allowing you to dig down and pour a traditional concrete footer